Follow these links for directions to projects:
1. Photo Cube 6 Theme Based Images = 1 Rockin objet d'art!
Your Choice: Six of Your Own Altered Photos
Or
Your Favorite Song in Six School Appropriate Panels
Or
Six of whatever you choose.
2. Make some seasonal art: here are some links for brushes and shapes
http://www.brusheezy.com/brushes/26084-thanksgiving-theme-photoshop-brushes
http://www.brusheezy.com/brushes/26084-thanksgiving-theme-photoshop-brushes
Tuesday, November 26, 2013
Thursday, November 14, 2013
PHOTOSHOP: DESATURATE AND RECOLOR STEPS
LEARNING TARGET: I can use Photoshop to recolor items in a realistic manner, using the paintbrush, gradient tool, pattern stamp or a clipping mask.


Monday, November 11, 2013
PHOTOSHOP: DESATURATE AND RECOLOR
Desaturate and Recolor Composition
1. Start a Photoshop document measuring 8.5 x 11 @ 150 dpi
2. Develop a composition of your choice, that features the following criteria:
• A minimum of 5 instances of de-saturation and re-coloring. Use both the color replacement tool and the full desaturate/recolor method. Also include instances of solid color, gradient, pattern and clipping mask.
• Your de-saturation and re-coloring must follow one of these color schemes: monochromatic, complementary, analogous (analogic), split complement, triad, tetrad, accented analogic. Check out the color notes on our Tumblr page! This page has great info about color harmonies too! Try the Color Scheme Designer here!
3. Save your composition as a JPEG with your name and the word recolor in the file title. (Mine would be kelywakelyrecolor.jpg)
4. Put the JPEG file in the Drop Box.
5. Do the write up:
A. Explain what type of color scheme you applied to your composition.
B. Identify the items you recolored with a SOLID COLOR, using the color replacement tool.
C. Identify the items you recolored with a SOLID COLOR, using the full desaturate and recolor method.
D. Identify the items you recolored with a GRADIENT.
E. Identify the items you recolored with a PATTERN.
F. Identify the items you recolored with a CLIPPING MASK.
G. Which blend modes did you use the most when recoloring?
H. Name something that was easy or difficult about the recoloring.
I. What advice would you give to someone else doing the same assignment?
6. Attach the write-up to the self assessment and turn in.

Thursday, November 7, 2013
INTRO TO TECH: INVENTION RESEARCH PROJECT AND VIDEO
Follow this link to the Research Project Calculator: https://rpc.elm4you.org/assignments/6118
Make your own account to save your own copy of this template that you can type on.
http://www.elm4you.org/students
http://www.elm4you.org/databases/topics/middleschool
http://www.elm4you.org/databases/topics/highschool
Student Resources in Context: http://ic.galegroup.com.proxy.elm4you.org/ic/suic/?p=SUIC&u=mnsminitex
Kids Search: http://web.ebscohost.com.proxy.elm4you.org/srck5/search?sid=a84b47db-56da-4a69-8093-fa3d0ad3e92c%40sessionmgr13&vid=1&hid=28
Student Research Center: http://web.ebscohost.com.proxy.elm4you.org/src/search?sid=c4cb0582-d878-4e81-9a0d-b4fe1d6aee8c%40sessionmgr15&vid=1&hid=28
Brittanica Middle http://school.eb.com.proxy.elm4you.org/levels/middle
Brittanica High: http://school.eb.com.proxy.elm4you.org/levels/high
Easy Bib Citation Generator: http://www.easybib.com/
SEARCH TIPS TO HELP YOU
1. Copy and paste your sources into a Word Doc or your Research Project Calculator Command + C = Copy
Command + V= Paste
Search Phrases
Who invented the
History of
Uses of
Changes in
Positive effects
Negative effects
How to find a good website:
1. .gov and .edu websites are going to be a more reliable source of info than .com sites.
2. Websites with good information are not going to try and sell you anything.
Bad sites are loaded with advertisements.
3. Good sites are updated regularly.
4. Bad sites are those which any person can post and edit information on.
Examples of unreliable websites
Wikipedia
Answers.com
Yahoo answers
ask.com
Wiki answers
about.com
ask.com
Wiki answers
about.com
Tuesday, November 5, 2013
PHOTOSHOP: FINISHING YOUR LENTICULAR IMAGE
1. Layout, Print, Mat Lenticular Image
A. Set up a Photoshop document that is:
Width: 14 inches
Height: 8.5 inches
Resolution: 300 dpi.
B. Place vertical guides at 1/2 inch intervals all across the document. Place horizontal guides at 1 inch and 7.5 inches.
C. Take your images and go to Layer > Flatten image. Then File > Save as, pick JPEG. Then place vertical guides at 1/2 inch intervals all across your images.
D. Use the guides to help you make clean selections of your images to splice together inside the 14 x 8.5 document. Make sure View > Snap To > Guides is checked. See http://photojojo.com/content/diy/how-to-make-lenticular-images/ for the splicing method.
E. Select all your layers by holding the SHIFT key as you click on them. Go to Layer > Align > Top Edges.
E. Save your Photoshop Document.
F. Flatten your Photoshop document. Save it as a Photoshop PDF.
G. Print and attend a matting demo.
Wednesday, October 30, 2013
PHOTOSHOP: LENTICULAR IMAGE
Go to http://content.photojojo.com/diy/how-to-make-lenticular-images/ to see an example of what we are doing.
To create a
lenticular image, one must splice two separate images together. Today, this is more commonly seen in
holographic type things. However,
lenticular images have a long history in painting as well. Lenticulars are great for showing off opposing
pairs. Your job is to create a
lenticular image that interprets a contrasting situation.
Solutions may
involve any subject matter, as long a visual and conceptual contrast is clear.
Idea Generation Process:
1. BRAINSTORM
Brainstorming
is when you decide WHAT items will be in your project.
Come
up with a list of at least FIVE ideas that could visually represent a
contrasting situation.
2. THUMBNAIL
Thumbnail
sketches are where you take what items you decided would be part of your
project and determine HOW you will arrange them in your composition. Pick your two favorite themes from the list
above and make sketches of what they will look like.
3. GET APPROVAL
You must show your sketches to me and have
them approved before you begin working on the final.
4. BEGIN WORKING
Create
two Photoshop documents that measure 6.5 x 6.5 inches @ 300 dpi.
You will create the
contrasting images on separate layers and splice the two together in another
document later.
See http://photojojo.com/content/diy/how-to-make-lenticular-images/
for more info.
Wednesday, October 9, 2013
LESSONS FOR WEDNESDAY OCTOBER 9
Photoshop Lesson Plan:
1. Watch the first three segments of the video
‘Introduction to Art: Visual Analysis’.
2. Exit Ticket: Find a poster on http://www.movieposter.com/ or use one of your own poster sketches. Describe how/where you see two elements of design and two principles of design in the image. (See list below.) Turn in to basket.
4. Use any leftover time to continue
with missing assignments or work on your poster sketches.
Intro to Tech Lesson
Plan:
1. Watch the video “Careers for
the 21st century: Computer
Occupations.”
2. Exit Ticket: Which two careers on the video are the most interesting to you and why?
Digital Photo Lesson
Plan:
1. Watch the first three segments of the video
‘Introduction to Art: Visual Analysis’.
2. Exit Ticket: Print one of your iSpy or 360 photos. Describe how/where you see two elements of design and two principles of design in the image. (See list below.) Turn in to basket.
3. Use the leftover time
to finish your iSpy Photo Hunt and start the Unit 5 reading on the Moodle. http://elearn.mpls.k12.mn.us/students/
Composition: The plan, placement, or arrangement of elements/principles of design in a work of art.
Elements of Design:
Color
Form
Line
Shape
Texture
Value
Principles of Design:
Harmony
Balance
Contrast
Movement
Repetition
Dominance
Scale
EXAMPLE
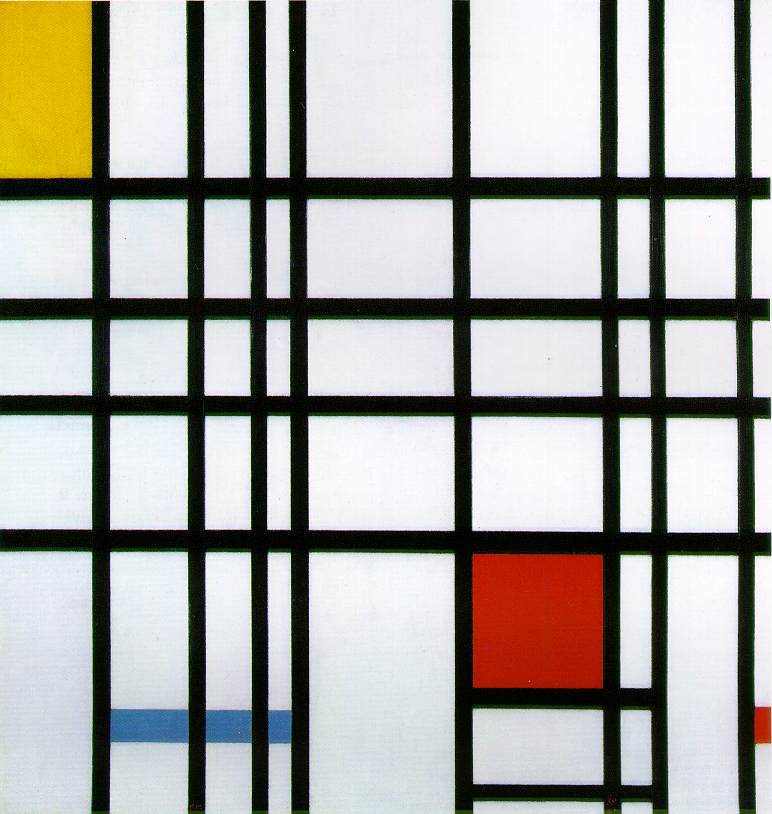
Piet Mondrian, Composition with Red, Yellow and Blue
1921; Oil on canvas, 39 x 35 cm
1921; Oil on canvas, 39 x 35 cm
This painting creates contrast by having everything be black and white except for the areas in color. The black lines lead the eye around to different areas in the painting, creating movement that keeps the eye going to the red, yellow and blue areas over and over.
Tuesday, October 8, 2013
PHOTOSHOP: MOVIE POSTER
MOVIE POSTER PROJECT
Your task is to create a movie poster. The poster must be made in the style of a real movie theater poster. The movie represented in your poster must be of your own creation. Do not make a poster for an existing movie.
GENRE: COMEDY or ACTION
GOAL: To inform people about and convince them to see the movie.
AUDIENCE: PG-13 moviegoers.
EXISTING SAMPLES: http://www.movieposter.com/ and http://step-art-tech.tumblr.com/ and http://www.htc-idvp.com/wp/?page_id=198 Look at a bunch of movie posters. Try to identify the point of emphasis, and the secondary/tertiary accents in the VISUAL HIERARCHY of the design. Think about how you will achieve this in your design.
POSTER CRITERIA:
1. 6 inches x 9 inches @ 300 DPI
2. Info coming soon:
*Clear VISUAL HIERARCHY. (There should be a point of emphasis, and secondary/tertiary accents.
*Definitive sense of SYMMETRICAL, ASYMMETRICAL, or RADIAL BALANCE to design.
*Some type of CONTRAST.
3. Your poster must incorporate a minimum of 6 separate images that have been worked into a cohesive image in Photoshop. You must include a movie title and other relevant movie text information.
4. Poster must include the use of at least 3 selection tools, 2 masking tools and 3 layer or brush tools.
5. At least four of the images must be public domain, creative commons licensed, or under your copyright, or copyright that someone has authorized for your use. Here are some good links for acceptable images:
http://search.creativecommons.org/
http://www.archive.org/
http://www.everystockphoto.com
http://sxc.hu/
http://freeres.info/
http://commons.wikimedia.org/wiki/Main_Page
http://morguefile.com/
6. You MUST include a bibliography of your image sources with your final design. Keep track of the websites you are getting images from by pasting links into a Word document.
7. Before you begin your final design, you must submit 3 sketch ideas for approval.
Thursday, October 3, 2013
PHOTOSHOP: CUSTOM BRUSH AND PATTERN, BLEND MODE AND LAYER STYLE LEARNING TARGETS
When you finish your examples:
1. Print each example.
2. Write the learning target and notes for how to do each procedure on the back of your printouts.
3. Staple together and turn in.
CUSTOM BRUSH

CUSTOM PATTERN

DOWNLOAD BRUSH


BLEND MODE AND LAYER STYLE

Monday, September 30, 2013
DIGITAL PHOTO: iSPY SCAVENGER HUNT
LEARNING TARGET: I can identify composition elements in a photo.
1. Log in to your student email OR your Google+ email.
2. Click on this link: https://docs.google.com/document/d/1YlGrkQVijoA0UiMoumMazgT3WWcfD6Z5nbpfzwe4KSk/edit?usp=sharing
3. Go to File > Make a copy.
4. Rename yourname_scavengerhunt
5. Now you have an electronic copy of the assignment requirements in your Google Drive.
6. You are going to use your iSpy photo set to create a presentation in Google Drive.
7. You will be looking for pictures in your photo set that show composition concepts taught in the Unit 4 reading on our Moodle page. http://elearn.mpls.k12.mn.us/students/
8. There are 3 sections to the assignment, with a total of 11 things you need to show. Here is a link to a sample presentation I am creating. It has one slide that represents each section right now. https://docs.google.com/presentation/d/17xG4A7FxRID0MBg5Ll1AVhLQCW1rXmgKmyUAYMsQ994/edit?usp=sharing
HELPFUL VIDEO LINKS:
Focal Point: http://thevirtualinstructor.com/how-to-create-focal-points.html
DIGITAL PHOTO: 360 DEGREES PHOTO LAYOUT
1. Open Photoshop
2. File > New
Width: 8.5 inches
Height: 11 inches
Resolution: 300 pixels/in
3. Find the 'VIEW' menu.
4. Open the 'VIEW' menu.
5. Make sure “Rulers” has a check mark next to it.
6. Pull guides out of the rulers.
7. Put vertical Guides at: 0.25 in, 4.25 in & 8.25 in
8. Put Horizontal Guides at: 0.25 in, 3.75in, 7.25in & 10.75 in
9. Find + Download your 6 favorite 360 pictures.
10. Resize and crop your 6 favorite pictures to be 4 in wide, 3.5 in height, 300 pixels/inch.
11. Move the pictures into the spots created by your guides.
Wednesday, September 25, 2013
INTRO TO TECH: DIGITAL MEDIA CAREERS
WHAT IS DIGITAL MEDIA?
Digital Media is the tools people use to develop print and interactive media.
A variety of careers exist that utilize digital media in a variety of ways. Students completing this course will develop skills which will familiarize them with computer software and studio equipment used in the Arts, Communications and Information Systems career field. Check that out here: http://cte.mnscu.edu/consortium_resources/documents/POS_ColorHighRes.pdf More information on digital media based careers can be found at: http://www.iseek.org/careers/arts.html
TIP: Use Google drive to do this assignment so you don't lose it.
http://henry.mpls.k12.mn.us/ Click on Students, then click on Student Email
You can also use the template I've shared here:
https://docs.google.com/document/d/1FtIz0N3b21R09O9VHb7xTQQUDo7yF3pocUaidy3darI/edit?usp=sharing
1. Pick 2 careers in the Arts, Communications and Information Systems career field you can find at http://www.iseek.org/careers/arts.html that you think you would be interested in.
2. Give two reasons why you think each career is interesting.
3. List the average wage for each occupation.
4. List the type of education required for each career.
5. List 3 colleges in Minnesota that offer degree programs for each career. Make sure each kind of degree is a different one. (3 different schools, with 3 different kinds of degree.)
6. Take the Career Skills Assessment. http://www.iseek.org/careers/skillsAssessment
7. Print the list the occupations that are suggested for you. Are the ones you picked out in the list?
8. Research two more careers on your list.
9. Pick the career you are most interested out of the 4 you researched.
10. Begin making your poster about that career.
Tuesday, September 24, 2013
SUB PLAN FOR TUESDAY 9/24
Period 5: Photoshop:
You have a work day to finish your masking tools tutorials, then start on the Masking Tools assignment. The priority
goes towards finishing and turning in the work from 9/20, then starting the
work for 9/23. Look at the for the date
and title post for directions. Click the links below:
9/20: PHOTOSHOP: Masking Tools Learning Targets **If you LOST any of these files, I will give you credit if you write the learning target and steps to create on a piece of paper.
Periods 6 + 7: Digital Photography:
1. Watch the DVD
“Photography Videos”.
2. Do the exit ticket the sub will give you.
3. Work time for:
·
Units 2 + 3 reading
·
Self critique for the 360 photo project (pink paper)
·
Peer critique for the 360 photo project. (blue paper)
Many of you have not handed in this work,
I only had about 1/3 of each group turn in those 3 assignments yesterday. The sub has extra copies of all three.4. If you are done with everything, you can:
· Work on something for another class.
· Do silent reading.
· Help others
· Start Unit 4 reading. yellow packets on tables on left side of the room.
· Start iSpy photo assignment in blue packet.
· Start iSpy photo assignment in blue packet.
Monday, September 23, 2013
PHOTOSHOP: MASKING TOOLS ASSIGNMENT
MASKING TOOLS LEARNING TARGET: I can use the masking tools in Photoshop to enhance my selections.
1. Set up a Photoshop document (FILE > NEW)
W: 8.5 inches
H: 11 inches
Resolution: 150 pixels/inch
OR
W: 11 inches
H: 8.5 inches
Resolution: 150 pixels/inch
2. Create a composition, using at least six different images, where you experiment with a variety of masking tools. The images you use may come from the Internet (make sure the images are at least 1000 x 1000 pixels), or from your own sources. You may also use the Photo Booth application to take a picture of yourself.
3. You must use at least three of the following masking tools:
Clipping Mask
Layer Mask
Quick Mask
Vignette Effect
4. You can also use selection skills we already learned:
Rectangular or Elliptical Marquee
Regular, Magnetic or Polygonal Lasso
Magic Wand or Quick Selector
Select via Color Range
Altered Selection via adding to or subtracting from it
Feathered Selection
Crop tool.
5. Print your design.
6. Write where each type of masking/selection tool you used can be seen on the back of the printout and turn it in.

Subscribe to:
Posts (Atom)