Wednesday, October 22, 2014

Searching for Images and Citing the Source

This website is a super handy guide for properly citing images you find online.
Citing the images you use in your movie poster is a big part of the grade.
http://libguides.scf.edu/c.php?g=125150&p=819068

You must use at least 6 images in your poster.  All image sources must be cited.  Additionally, at least 3 images must be public domain, creative commons licensed, or under your copyright, or copyright that someone has authorized for your use. Here are some good links for acceptable images:

Monday, October 20, 2014

EMPHASIS AD ANALYSIS

EMPHASIS AD ANALYSIS
1. Select a magazine advertisement, from the magazines provided in class. Cut it out and tape or glue it to the paper provided in class.
2. Identify its GOAL and AUDIENCE. (What are they trying to do, and who are they trying to reach?)
3. Identify the point of EMPHASIS in the ad. Clearly mark it on your layout.
4.  Identify a SECONDARY ACCENT and a TERTIARY ACCENT.  Clearly mark them on your layout.
5. Name two techniques for effective emphasis listed on pages 27,28 and 29 your text that are used in the ad. Clearly mark them on your layout. 
6. Do you think the ad is effectively reaching the demographic (audience) they hope to target? Explain why or why not in 1-2 sentences on your paper.

7.  Share your analysis with a classmate.


Thursday, October 2, 2014

DIGITAL PHOTO ASSIGNMENTS 10/2

1.If you are working on your lenticular, you can finish on Monday.  Do the activities listed below instead.
2.Open the “Fake Shadow” folder in Hand-Out.  Watch
       “Quick Mask.swf”, then “Fake Shadow.mp4.  Practice using the pictures of the horse.  Apply the fake shadow technique to a different photo of your choice.  Save as a JPEG and put in Hand-IN.

3.Open the “Filters Assignment” folder in Hand-Out.  Watch
       “Layers and Filters.mp4”.  Create a filter sampler of your own.  Make sure to keep track of your filter settings on a piece of paper because you have to type them onto the document.  You can't look it up after you apply the filter.  Save as a JPEG and put in Hand-IN.

GRAPHIC DESIGN INTRO: BRUSHES, PATTERN, LAYER STYLES, BLEND MODES & OPACITY ASSIGNMENT

Create a Photoshop document that is 8.5 x 11 OR 11 X 8.5 @ 150dpi. 
Use at least 6 images.
Demonstrate at least one thing from each of the following topics:
1. BRUSHES:  Downloaded brushes or custom brushes made from selections
2. PATTERNS:  Downloaded patterns or patterns made from selections. 
                          Can be applied with a FILL LAYER or with the PATTERN STAMP.

3. LAYER STYLES:  Anything in the “FX” options at the bottom of the layer panel
4. BLEND MODES:  Anything from the drop down menu at the top left side of the layer panel.
5. OPACITY:  Any opacity setting below 100%. 
Adjust using the percentage box or slider at the top right side of the layer panel.
 

You can download a ton of cool patterns and brushes at 
http://www.brusheezy.com/

Save your final work as a JPEG and submit to Hand-In.  When you receive your printout, write down which tools you used and where they can be seen on the back.

Learning Targets: 
I can create custom brushes and patterns from selections.
I can download and install custom brushes and patterns.
I can create special effects using blend modes, layer styles, and opacity settings.

CUSTOM BRUSH

CUSTOM PATTERN

DOWNLOAD BRUSH

BLEND MODE AND LAYER STYLE


Thursday, September 25, 2014

DIGITAL PHOTO: LENTICULAR IMAGE

1. Set up a Photoshop document that is:
     Width: 14 inches
     Height: 8.5 inches
     Resolution:  300 dpi.
2. Place vertical guides at 1/2 inch intervals all across the document. Place horizontal guides at 1 inch and 7.5 inches.
3. Open the images you want to use in your lenticular.  Use the Crop tool to resize the pictures to:
     Width:  6.5 inches

     Height:  6.5 inches
     Resolution:  300 dpi
4. Place vertical guides at 1/2 inch intervals all across the pictures. 

5. Use the guides to help you make clean selections of your images to splice together inside the 14 x 8.5 document. Make sure View > Snap To > Guides is checked. See http://photojojo.com/content/diy/how-to-make-lenticular-images/ for the splicing method.
6. Select all your layers by holding the COMMAND key as you click on them. Go to Layer > Align > Top Edges.
7. Save your Photoshop Document.
8. Flatten your Photoshop document. Save it as a Photoshop PDF.
9. Put in Hand-In folder and tell me when you have done this.

Friday, May 30, 2014

DIGITAL MEDIA FINAL PROJECTS

1.  3-D Image:  See me for directions sheet and 3-D glasses.  More examples in the Hand-Out folder.


2.  Animated .gif:  See me for directions sheet.


3. Lenticular Image (Like the display across from the main office.)
*You might do this as a required assignment in another Digital Media course in the future.  #beware
Show the same object in two different states (My cat as a Muppet and as a Lion)
Show a pair of objects (Hall & Oates)
Show a set of opposites (Day & Night, Good & Evil, Man & Woman, etc.)

4. Photo Cube 6 Theme Based Images = 1 Rockin objet d'art!
Your Choice: Six of Your Own Altered Photos
Or
Your Favorite Song in Six School Appropriate Panels

Friday, May 9, 2014

DIGITAL VIDEO: DOCUMENTARY FILM

You will work in a group to create a documentary film.

Use the Research Project Calculator to keep track of information and deadlines:
https://rpc.elm4you.org/assignments/6868 

FILM REQUIREMENTS:

1.  School appropriate topic.  Here are some links to help you pick a topic:
PBS POV Documentaries:  http://www.pbs.org/pov/video/search.php?search_type=classroom_clips#.U20Hl61dVbo

Points of View Reference Center:  http://web.b.ebscohost.com.proxy.elm4you.org/pov/search/basic?sid=145b70f3-9650-43a4-89e0-0ebe479f80b1%40sessionmgr111&vid=2&hid=128

Desktop Documentaries:  http://www.desktop-documentaries.com/documentary-ideas.html

2.  A hypothesis about the topic is presented and defended.
3.  Information about the topic is compiled and reported from at least 3 different online sources.
4.  People are interviewed for their opinions about the topic.
5.  Film contains "A-Roll" (talking people) and "B-Roll" (supporting imagery) footage.
6.  Film is approximately 5 minutes long.


Tuesday, May 6, 2014

DIGITAL PHOTO: BLEND MODES AND LAYER STYLES


LT:  I can use Blend Modes and Layer Styles to create special effects in Photoshop.


Blend Modes and Layer Styles can add interest to your Photoshop compositions.
You will need to use both techniques in your Mural Project.
The best way to learn about them is to jump in and experiment with both, you will find the effect you are looking for (and maybe also have some happy accidents!)

DIRECTIONS:

1.  Find the Folder called "Blend Modes and Layer Styles" in the Hand-Out folder.

2.  Watch the videos "BlendMode.swf" and "LayerStyle.swf" in the Blend Modes and Layer Styles folder.  You can also use the document "LayerBrushTools.psd" as a reference and use the source images in the folder for experimenting.

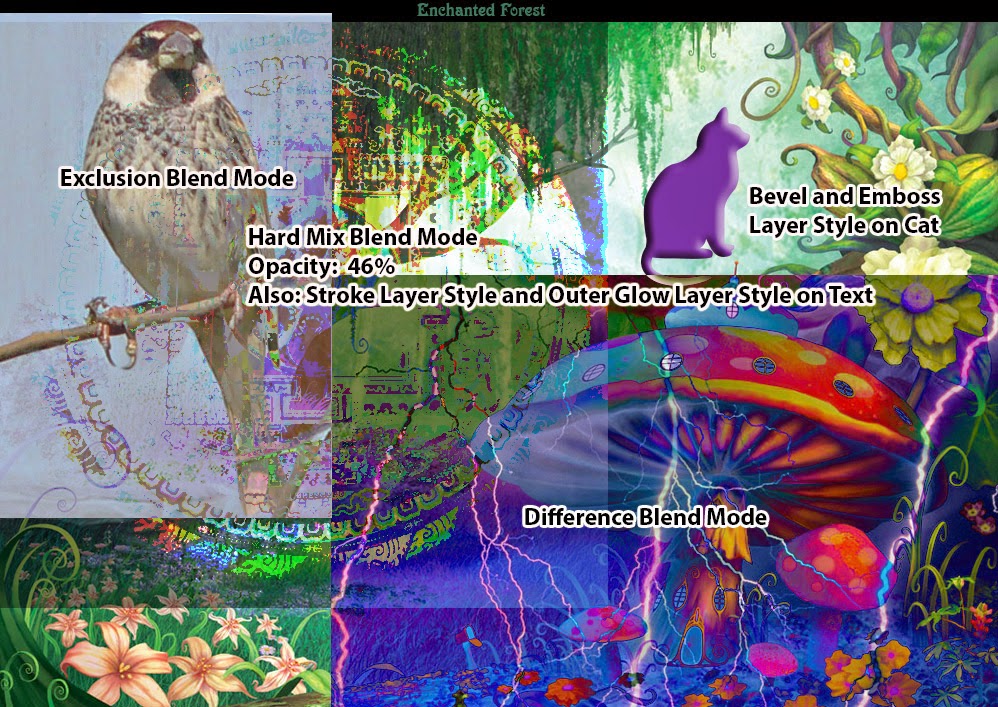
2.  Create a small composition where you have applied at least 3 Blend Modes and at least 3 Layer Styles.  Label each with the Type Tool.  Save the compositon as a JPEG, with your name in the file title and turn in to the Hand-In folder.

EXAMPLE COMPOSITION:


Wednesday, April 16, 2014

DIGITAL PHOTO: 6 Photo Layout

1.  Open Photoshop
2.  File > New 
Width:  8.5 inches
Height: 11 inches
Resolution:  300 pixels/in
3.  Find the 'VIEW' menu.
4.  Open the 'VIEW' menu.
5.  Make sure “Rulers” has a check mark next to it.
6.  Pull guides out of the rulers.
7.  Put vertical Guides at:  0.25 in, 4.25 in & 8.25 in
8.  Put Horizontal Guides at:  0.25 in, 3.75in, 7.25in & 10.75 in
9.  Find + Download your 6 favorite pictures.
10.  Resize and crop your 6 favorite pictures to be 4 in wide, 3.5 in height, 300 pixels/inch.
11.  Move the pictures into the spots created by your guides.

Saturday, April 12, 2014

INTRO TO TECH: CREATING MLA CITATIONS

You will need to create MLA citations for the information and images you used in your brochure or poster.  Since we got all of our information online, this post is only about creating citations for information and images found online.  Find the situation that applies to you and follow the directions below.  Use the links to go to the websites provided for information and diagrams.

How to Cite a Website in MLA
Information below taken from the following link.  Go there to learn more:

Citing a website article with an author

Citation Structure:
Last, First M. “Article Title.” Title of Webpage. Name of website, Date Month Year Published. Web. Date Month Year Accessed.

Example Citation:  Moye, David.  "Conjoined Twins Refuse to be Separated".  Huffington Post,  10 Apr. 2014.  Web.  12 Apr. 2014

Citing a website with no author

Citation Structure:
“Website Article.” Title of Webpage. Title of website, Date Month Year Published. Web. Date Month Year Accessed.
Example Citation:  Kindergarten Teachers.  iSeek Careers,  n.d.  Web.  12 Apr. 2014


Note:  If there is no article title, skip it and go straight to website title, like in my example.
Note:  If there is no Date Month Year Published, write "n.d.", like in my example.
Link to article example citation was created from: 


Citing a Photograph in MLA

Follow this link to see examples and find the situation that applies to you.


Citation Structure:
Description or Title. Digital Image. Title of Webpage. Name of website, Date Month Year Published. Web. Date Month Year Accessed. 
Example:  Cats Playing in Garden.  Digital Image.  Cute Cat Pictures.  Dilaf,  n.d.  Web.  12 Apr. 2014.
Note:  Most of you will not know the name of the photographer of your image, so you can follow the structure below.  If you do know the name of the photographer add their name as "Last, First M." at the beginning of the citation.
Link to article example citation was created from:  http://www.dilaf.com/cute-cat-pictures/